Upgrade python to version 3.5 in Centos 6.8 and deploy flask web app framework (updated on 20170604)
Contents
Updated on 20170604: I put in more content to setup on tools chain for python development environment. Extra options were deleted.
I bought a VPS from ramnode last time (last blog), so I guess it is a good time to deploy some web application on it. Since the python came with Centos 6.8 is kind of old (python 2.6), the first step I take is to upgrade the python compiler in Centos 6.8 to python3. And then I try to deploy a web framework from python called flask. It is simple but very pythonic. To read its code is a good way to learn python too. This blog will include:
- Upgrade python in Centos 6.8 to python 3.4 and install some basic packages;
- Install tools chain (setup tools, line_profiler) for python 3.4;
- Deploy flask web application framework and host a static html file as an example;
Upgrade to python 3 in Centos 6.8 and install some basic packages
First, many servers chose the minial installation of Centos 6.8, we have to install/update the tools chain in Centos to make sure the tools we need are installed and updated. This can be done by
yum update
yum groupinstall -y 'development tools'
yum install -y zlib-devel openssl-devel sqlite-devel bzip2-devel
Second, install the python 3.
This can be done in two ways, from Centos’s package manage system (yum) or from source code.
- Using the source code:
Follow the regular linux workflow:
1 download the source code
2 configure the installation directory and necessary lib
3 make
4 make install
5 ln to link to a convenient folder (/usr/bin?)
curl -O https://www.python.org/ftp/python/3.5.0/Python-3.5.0.tgz
tar zvxf Python-3.5.0.tgz
cd Python-3.5.0
./configure --prefix=/opt/python3
make
# This is to avoid overwrite the python 2.6 in the system. Overwrite of this python may  # have unforseen problem
sudo make altinstall
ln -s /opt/python3/bin/python3 /usr/bin/python3
or
alias python3='usr/local/bin/python3.5'
So, by using “altinstall”, we still keep a copy of python 2.6 that comes with Centos. In the future, python3 would run python v3.5 and python would evoke python 2.6. The pip and setup tools for python are installed as well. (run by “pip3.5”)
This is convienent, since all of the python setup tools are installed as well,i chose this for my server. But there are other ways to do:
- Using YUM:
Unfortunately, the default yum repository does not contain python 3 version. However, there is a repository from EPEL 7 (Extra Packages for Enterprise Linux) which offers python 3.4. To add this repository to the system, we need to run: ( Method Two in http://ask.xmodulo.com/install-python3-centos.html)
# add source repo
yum install epel-release
# install python 3.4
yum install python34
However, in this way, you didn’t install the python installation package or pip, which is the package manage for python. We could do
yum install python34-setuptools
easy_install-3.4 pip
Be careful, now there are two different python systems installed. The reason for this, is we want to keep python 2.6 for system to use (There are some system tools depend on python 2.6, e.g. yum). So when you want to install packages for python 3.4 or run python 3.4, you should use:
pip3 install <pakage name>
python3 <python code>
Now, we are installing performance tuning package, line_profiler. “–pre” is used because of the new rule from pip that it will only install stable version while line_profiler is still development version (https://stackoverflow.com/questions/24215492/pip-install-line-profiler-fails).
pip3 install --pre line_profiler
Or there is another repo source, SCL (Software Collections), which also contains the python 3. To enable this repo in Centos, please check out:http://xmodulo.com/enable-software-collections-centos.html
After installation of SCL, one could do
# for SCL
yum install python33
scl enable python33
scl enable python33 bash
And there is still another repo ( short for repository) called RHSCL (Red Hat Software Collections) but you need to be a customer of RedHat to access to this. (check out https://access.redhat.com/solutions/472793)
Third, install some basic packages for python
- virtualenv
  yum install python-devel
  pip install virtualenv
This app is to create a separate python virtual environment, so python apps will not disturb each other.
  # create a new env1 and the global packages are accessable to it by "--system-site-packages"
  virtualenv --system-site-packages env1
Then a folder with the same name would be created and in the folder will have copies of lib and executable files installed. So you could enter the virtual environment by changing to that folder and activate it (source bin/activate). We will install flask in that environment to avoid contamination to the system.
  cd env1
  source bin/activate
  which python3.4
  # This will show the python3.4 is from the virtual environment folder
As shown below:
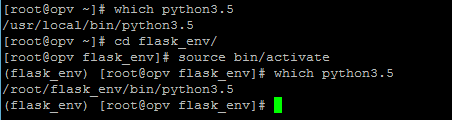
What does this picture tell you is before switching into env1, the compiler is from the global system, but after switching into env1, the compiler is from the env1. So this shows the effect of switching into a virtual environment, everything will be separated from others.
Deploy the flask application framework
1 Setting up and switching into the virtual environment called “flask_env”, where we will deploy flask into and activate it.
2 run setup tools to install flask
  # i chose the compile source code, so pip3.5 is the setup tools
  pip3.4 install flask
- 3 create project folders for files to reside in.
  # where to put the python script
  mkdir hello_app

  # where to put html/css
  mkdir hello_app/static

  # where to put the html templates
  mkdir hello_app/templates
4 As a demonstration, we will do two ways to show “Hello, world!” to an outside browser.
4.1 Directly show a “Hello, world!” , which from a python code. Save the following codes as a file called “views.py”
    from flask import Flask

    app = Flask(__name__)

    @app.route('/')
    def index():
        return 'Hello, world!'

    if __name__ == '__main__':
        app.run(debug=False, host='0.0.0.0')
So, this piece of code will return a python string “Hello, world!” to a browser response. “@app.route(‘/’)” takes care of what is called “route control”. This is basically about the URL you entered into the web address. “/” would mean requesting the root directory in the URL. And to response to this request, the code uses “def index()”, which is “Hello, world!”
And the code in ‘if name ==_main__’ told the program if this file (“views.py”) is run from the command line(not being imported to another python file), then it will do the “app.run “. (with “debug=True” meaning the website is not reachable by external agencies but only local compute could see it and debug=False would do just the opposite. And “host=‘0.0.0.0” meanse, any IP could see this page.)
After building up the code, we could run it.
python3.4 views.py
And check out by type http://127.0.0.1:5000 in your browser.
- 4.2 Another way is to use a template to build a HTML file and render this file to show “Hello, world!”
The first step, we will go to build the “index.html” used as a “template”, which will be put inside the current environment.
# make several folders to hold the files for this project
mkdir webapp
mkdir webapp/templates
mkdir webapp/static

# now we will work in the webapp folder
cd webapp
After changing the directory into “webapp”
# Template file, to be put into ./webapp/templates
<html>
<body>
<h1>Hello from a template!</h1>
</body>
</html>
Then, we will redirect the request to “/” folder to this file. In order to achieve this, we need to modify the views.py:
# views.py, to be put into ./webapp
# import another library
from flask import Flask, render_template

app = Flask(__name__)

@app.route('/')
def index():
    # instead of return a string, now return the file.But the html file must be put into ./templates folder
    return render_template('index.html')
if __name__ == '__main__':
    app.run(debug=True, host='0.0.0.0')
Still, we could run:
python3.4 views.py
And now you should see the line below after input http://127.0.0.1:5000 into your browser

- 5 Not finished!
In modern program, we inclined to separate the data part and the logic part in one program and save them seperately into different folders. And for html specifically, we also want to separate the style part (mainly CSS files) to another folder, so it would be easier to change to another style while keeping the content the same. Doing so will make it easier for later maintenance/upgrade. And since the system grows bigger, we also need a separate script to start the system.
Now we are going to do this!
./webapp
is the project root
./webapp/static
where CSS files are stored
./webapp/templates
where templates html files are stored
./webapp/app
where python scripts are stored
A starting script will be in the root folder.
#CSS file to be put into ./webapp/static
body {
  background: red;
  color: yellow;
}
# template html file, to be put into ./webapp/templates
<html>
<head>
<link rel="stylesheet" href='/static/style.css' />
</head>
<body>
<h1>Hello from a template!</h1>
</body>
</html>
We would use a seperate python script to initiate all of the parameters for the system. For example, where is the template folder? By default, the flask will look for a folder named “templates” in the subfolder of where “render_template() “ has been called. In our code, it is called in ./webapp/app, so it will look for “templates” subfolder in ./webapp/app. But it won’t find it because our template folder is actually “./webapp/templates”. So we need to point this out to python.
# __init__.py to be put into ./webapp/app/__init__.py
from flask import Flask

app = Flask(__name__, template_folder='../templates')
from app import views
views.py to put into the subfolder “./app”
# views.py to be put into ./webapp/app
from app import app

@app.route('/')
def index():
    # instead of return a string, now return the file. But the html file must be put into ./webapp/templates folder
    return render_template('index.html')
To start the flask, we still need a script to initiate python compiler:
# please change to your python compiler accordingly. it can be located by typing "which python" in command line
#! ../bin/python3.5
from app import app
app.run(debug=True,host='0.0.0.0')
To start web service, simple run
chmod a+x run.py
./run.py
And then check out the browser at port 5000 by
http://Your_ip_address:5000
if for some reason, you could see any pages from your browser, you should check your firewall settings for your sever, which can be done by “iptables -L -v” (for centos 7, use “firewall”).
Reference:
1 How to install Python3 on CentOS
2 How to enable Software Collections (SCL) on CentOS
3 Problems installing python3 on RHEL
4 The Flask Mega-Tutorial : The beginning is not quite friendly, but could use “5” instead. The later chapters are good
5 BUILD A PYTHON-POWERED WEB SERVER WITH FLASK : Very good guide, simple and step by step
6 Flask Template Not found: Solving the problem of how to personalize the location of templates folder.